Imagine a world where the clock is your adversary and the pantry is your only ally. You are staring at a shelf of legumes and a ticking stopwatch. Most people see a can of beans; you see a structural blueprint for a high-velocity masterpiece. We are not just boiling water here. We are conducting a high-stakes engineering project to create the ultimate Quick White Bean Soup. The goal is a liquid that feels like velvet on the tongue and a flavor profile that suggests you spent six hours hovering over a stockpot. In reality, we are going to cheat time using the magic of starch-based emulsification. We are looking for that perfect moment where the fats from a high-quality olive oil bind with the released bean starches to create a viscous, shimmering broth. It is piquant, it is hearty, and it is ready before your delivery driver can even find your GPS coordinates. This is culinary infrastructure at its most efficient. Get your apron on; we have a soup to build.
THE DATA MATRIX
| Metric | Specification |
|---|---|
| Prep Time | 5 Minutes |
| Execution Time | 10 Minutes |
| Yield | 4 Servings |
| Complexity (1-10) | 3 |
| Estimated Cost per Serving | $1.15 |
THE GATHERS
Ingredient Protocol:
- 2 cans (approx. 800g / 28oz) Cannellini or Great Northern beans; drained but not rinsed.
- 500ml / 2 cups High-quality vegetable or chicken bone broth.
- 60ml / 4 tbsp Extra virgin olive oil; divided for cooking and finishing.
- 4 cloves / 20g Fresh garlic; smashed and finely minced.
- 1 medium / 150g Yellow onion; finely diced.
- 5g / 1 tsp Dried rosemary or thyme; crushed to release oils.
- 2g / 0.5 tsp Red pepper flakes for a piquant kick.
- 15ml / 1 tbsp Fresh lemon juice for acidity.
- To taste Flaky sea salt and freshly cracked black pepper.
Section A: Ingredient Quality Audit:
The primary failure point in a Quick White Bean Soup is the bean texture. If your canned beans are "chalky," the starch will not properly hydrate into the broth. To fix this, add a pinch of baking soda to the pot; this raises the pH and softens the hemicellulose in the bean skins instantly. If your broth tastes flat or metallic, do not panic. A teaspoon of tomato paste or a splash of soy sauce will provide the glutamates needed to simulate a long-simmered depth. Finally, ensure your olive oil is fresh. If it smells like crayons, it is oxidized. Discard it and use a neutral oil with a touch of butter instead to maintain the fat-to-starch ratio required for a stable emulsion.
THE MASTERCLASS
Step-by-Step Execution:
1. The Aromatics Foundation
Place your saucier over medium heat and add 30ml of olive oil. Once the oil shimmers, add the diced onions. Use a bench scraper to transfer your minced garlic and herbs directly into the pan. Sauté until the onions are translucent but not browned.
Pro Tip: This stage is about sweat, not color. By keeping the temperature moderate, you infuse the oil with alliums without triggering the Maillard reaction, which would turn the garlic bitter. Use a digital scale to ensure your garlic-to-onion ratio is precise for consistent flavor.
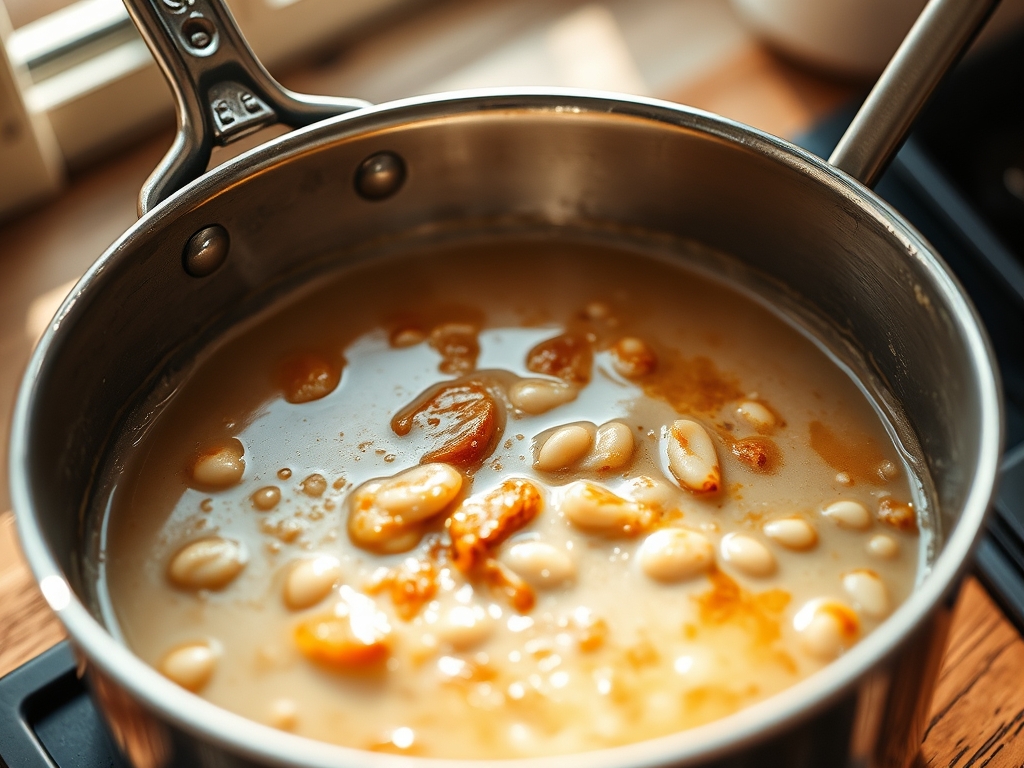
2. The Starch Release
Add the beans and their residual canning liquid to the pan. Use a wooden spoon or a potato masher to crush approximately one-quarter of the beans against the side of the saucier.
Pro Tip: This is the "Infrastructure" part of the recipe. By crushing a portion of the beans, you release internal starches into the fat. This creates a natural thickener that allows the broth and oil to emulsify, resulting in a creamy mouthfeel without the need for heavy dairy.
3. The Broth Integration
Pour in the 500ml of broth. Increase the heat to high and bring the mixture to a vigorous boil. Once boiling, reduce to a simmer and let it rapidly bubble for five to seven minutes.
Pro Tip: A rapid boil is essential here. The mechanical energy of the bubbles helps to aerate the liquid and force the oil and starch molecules to bond. If you merely simmer gently, the oil will separate and float on top in unappealing yellow slick.
4. The Acid and Fat Finish
Turn off the heat. Stir in the lemon juice and the remaining olive oil. Season aggressively with salt and pepper. Use a whisk to vigorously stir the soup one last time before serving.
Pro Tip: Adding the final "finishing oil" off the heat preserves the volatile flavor compounds of the extra virgin olive oil. This creates a layered taste profile where the cooked oil provides body and the raw oil provides a grassy, fresh aroma.
Section B: Prep & Timing Fault-Lines:
The most common human error is the "Garlic Burn." If your pan is too hot when the garlic hits, it will turn acrid in seconds. Always have your broth measured and ready before the garlic touches the oil. If you find the soup is too thick, do not just add water; add more broth or a splash of the bean liquid to maintain the mineral balance. If the soup feels "thin" at the ten-minute mark, simply crush more beans. Your timing depends on the surface area of your pan; a wider saucier evaporates liquid faster, concentrating the flavor more quickly.
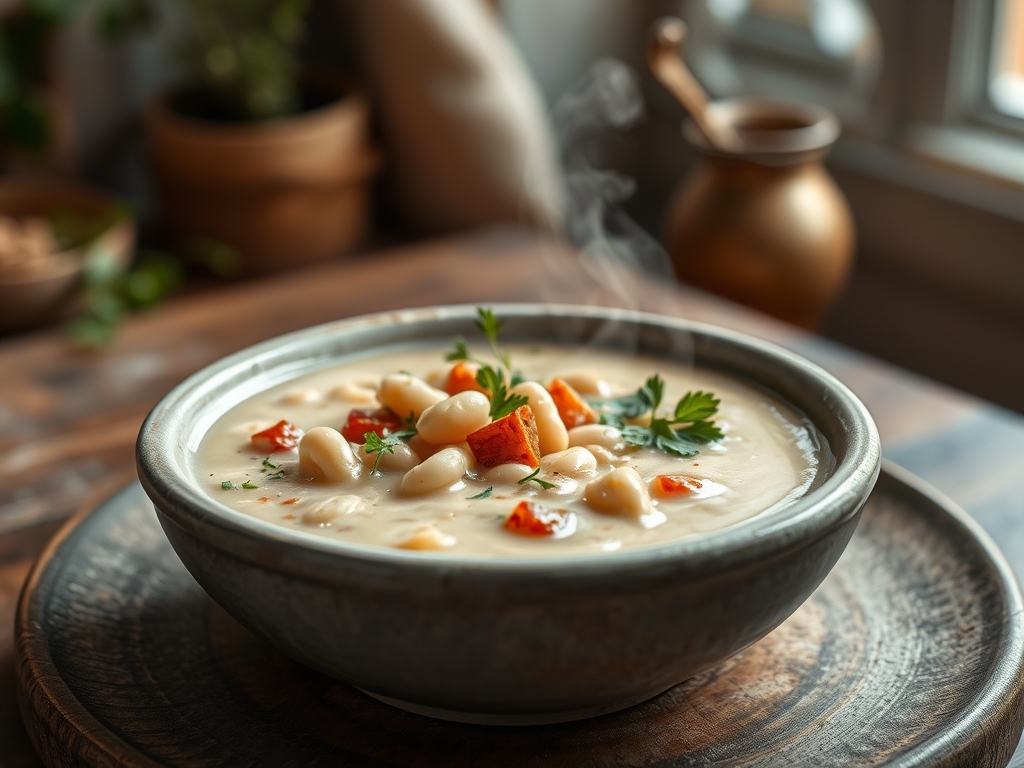
THE VISUAL SPECTRUM
Section C: Thermal & Visual Troubleshooting:
Look closely at the Masterclass photo. Notice the viscous sheen on the surface? That is the sign of a successful emulsion. If your soup looks watery or clear, you have not crushed enough beans or the boil was too weak. The color should be an off-white, creamy ivory. If it looks grey, your dried herbs were likely old or you over-toasted the garlic. To brighten a dull-looking soup, add a handful of fresh parsley or a swirl of bright green pesto right before serving. The red pepper flakes should appear as distinct, vibrant jewels in the broth, not as a muddy tint. If the beans look "shredded" rather than whole, you were too aggressive with the masher; aim for a 25% crush rate for the ideal structural contrast.
THE DEEP DIVE
Macro Nutrition Profile
A single serving of this Quick White Bean Soup delivers approximately 280 calories. It is a powerhouse of complex carbohydrates and plant-based protein, providing roughly 12g of protein and 10g of dietary fiber. The monounsaturated fats from the olive oil provide sustained energy and aid in the absorption of the fat-soluble vitamins found in the herbs and garlic.
Dietary Swaps (Vegan/Keto/GF)
This recipe is naturally vegan and gluten-free. For a Keto-compliant version, reduce the bean count by half and substitute with roasted cauliflower florets to maintain bulk while lowering the net carb count. To increase the protein density for athletes, stir in 100g of shredded rotisserie chicken or a poached egg at the very end.
Meal Prep & Reheating Science
When reheating, the starch molecules will have retrograded, making the soup appear like a thick gel. To restore the molecular structure, add 30ml of water or broth and heat slowly while whisking. This re-hydrates the starch chains and re-incorporates the fats. Avoid the microwave if possible; a stovetop reheat ensures the emulsion stays intact without breaking into a greasy mess.
THE KITCHEN TABLE
Why is my soup oily on top?
The emulsion broke because the boil wasn't vigorous enough. To fix this, whisk in a teaspoon of mustard or simply blend one cup of the soup and stir it back in to re-bind the fats and liquids.
Can I use dried beans instead?
Not for a 15-minute window. Dried beans require a 12-hour soak and a 90-minute simmer. This infrastructure is specifically designed for the pre-gelatinized starches found in high-quality canned legumes to save you hours of labor.
What is the best way to store leftovers?
Place the soup in an airtight glass container. It will stay fresh in the refrigerator for up to four days. The flavors actually deepen over time as the garlic and rosemary continue to infuse the starch matrix.
Is the lemon juice mandatory?
Yes. The acid acts as a chemical "brightener." It cuts through the heavy starches and fats, elevating the flavor profile from "heavy" to "vibrant." Without it, the soup will taste flat regardless of how much salt you add.