The culinary world is a battlefield of textures, and nothing represents a failed skirmish quite like the jagged, cratered surface of a poorly peeled egg. We have all been there; standing over a sink, picking away microscopic shards of calcium carbonate while the precious white membrane clings to the shell like a stubborn limpet. This is a failure of infrastructure. To achieve the platonic ideal of Instant Pot Hard Boiled Eggs, one must move beyond the erratic nature of a boiling pot and embrace the precision of atmospheric pressure. We are looking for a structural miracle: a yolk that is creamy and vibrant, encased in a white that is firm yet tender, and a shell that slides off in two clean arcs. This is not just breakfast; it is an exercise in thermodynamics. By utilizing high-pressure steam, we force moisture between the egg white and the shell, effectively pre-lubricating the separation process. Forget the old wives' tales about vinegar or salt. We are deploying the 5 5 5 Pressure Protocol to ensure total dominance over the albumin.
THE DATA MATRIX
| Metric | Specification |
|---|---|
| Prep Time | 2 Minutes |
| Execution Time | 15 Minutes |
| Yield | 6 to 12 Servings |
| Complexity (1-10) | 2 |
| Estimated Cost per Serving | $0.25 |
THE GATHERS
Ingredient Protocol:
- 12 Large Grade A Eggs (approx. 600g / 1.3 lbs)
- 235ml / 1 cup Filtered Water
- 1.5kg / 3.3 lbs Ice Cubes (for the thermal shock bath)
- 1000ml / 4 cups Cold Water (for the thermal shock bath)
Section A: Ingredient Quality Audit:
The primary failure point in egg infrastructure often begins at the source. Freshness is usually a virtue, but in the realm of the hard-boiled egg, "farm fresh" can be a liability. Extremely fresh eggs have a lower pH level, which causes the albumin to bond more tightly to the inner shell membrane. If you are working with eggs straight from the coop, you may need to increase your pressure time by 60 seconds to compensate for the tighter molecular bond. Furthermore, ensure your eggs are free of hairline fractures. Even a microscopic fissure will cause the white to render out into the water under pressure, creating a wispy, unappealing mess. If your eggs are refrigerated, do not let them reach room temperature before starting; the thermal delta between the cold egg and the hot steam is essential for the "shock" effect that aids in peeling.
THE MASTERCLASS
1. The Hydration Phase
Place the stainless steel wire rack into the inner pot of your pressure cooker and pour in 235ml / 1 cup of filtered water. Carefully arrange the eggs on the rack in a single layer if possible, though stacking is permissible in larger units. Ensure the water level remains below the eggs; we are steaming, not boiling.
Pro Tip: Use a digital scale to ensure your water volume is precise. Too much water increases the time it takes for the unit to reach pressure, which inadvertently overcooks the eggs during the ramp-up phase.
2. The Pressure Sequence
Secure the lid and set the steam vent to the "Sealing" position. Select the Manual or Pressure Cook setting and adjust the timer to 5 minutes at High Pressure. The internal temperature will rapidly climb, causing the air pocket inside the egg to expand and pull the membrane away from the shell.
Pro Tip: While the machine is pressurized, use a bench scraper to clear your workstation. Maintaining a clean "mise en place" is the hallmark of a professional kitchen auditor.
3. The Natural Dispersion
Once the timer signals completion, do not touch the vent. Allow the unit to sit undisturbed for exactly 5 minutes of Natural Pressure Release (NPR). This allows the internal temperature of the yolk to stabilize without the violent agitation of a sudden pressure drop.
Pro Tip: The science here involves the viscous nature of the yolk; a sudden release of pressure can cause the yolk to expand too quickly, leading to the dreaded green sulfur ring.
4. The Manual Evacuation
After the 5-minute natural release, use a long spoon to toggle the steam vent to "Venting" to release any remaining internal pressure. Immediately open the lid, being careful of the rising steam, and prepare for the transfer.
Pro Tip: Use a saucier or a small pot to hold your ice bath nearby. Minimizing the distance between the Instant Pot and the ice bath prevents "carryover cooking" from ruining the texture.
5. The Cryogenic Shock
Using tongs, immediately plunge the eggs into a large bowl filled with ice and water. Let them submerge for a final 5 minutes. This rapid cooling halts the cooking process instantly and causes the egg to shrink slightly within the shell, creating the perfect gap for an easy peel.
Pro Tip: The thermal shock is the most critical step for Instant Pot Hard Boiled Eggs. Without it, the residual heat will continue to infuse the whites with a rubbery texture.
Section B: Prep & Timing Fault-Lines:
The most common human error in this protocol is "timer drift." If you rely on a manual clock rather than the digital interface of the cooker, you risk a 30 to 60-second variance that can turn a jammy yolk into a chalky one. Another fault-line is the ice-to-water ratio. If your ice bath is mostly water, the thermal mass will not be sufficient to drop the egg's core temperature fast enough. You want a slushy consistency. Finally, check your altitude. If you are cooking at high elevations, you must increase your pressure time by 5% for every 1,000 feet above sea level to account for the lower boiling point of water.
THE VISUAL SPECTRUM
Section C: Thermal & Visual Troubleshooting:
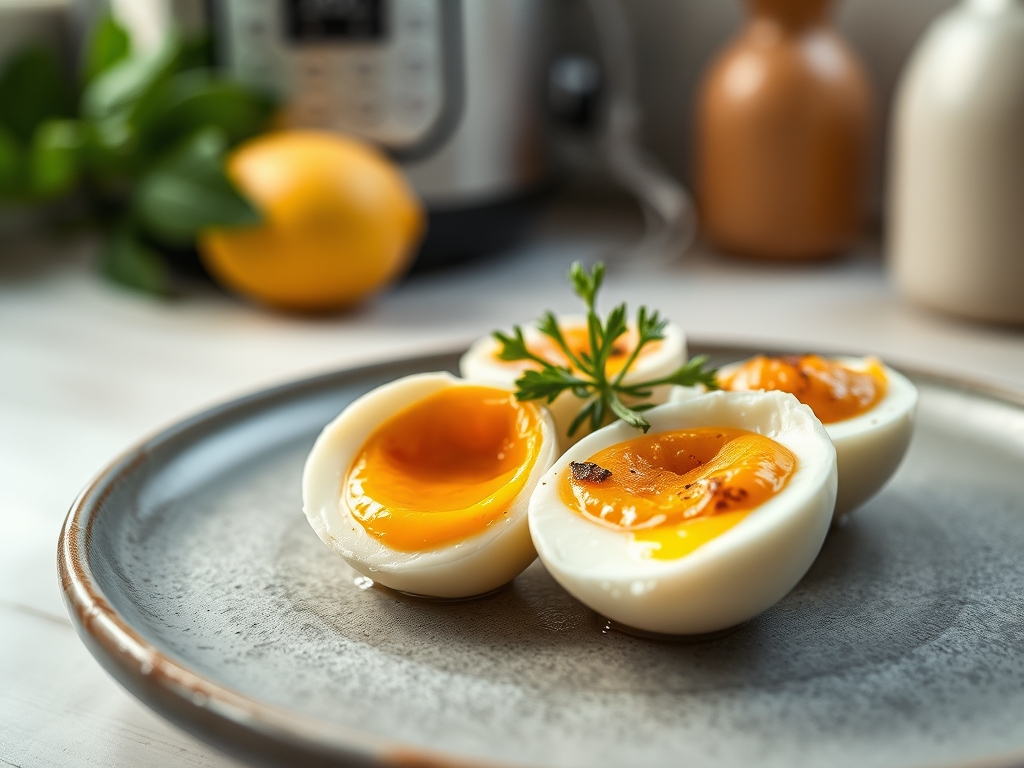
In the Masterclass photo above, observe the pristine, matte finish of the egg whites. If your eggs appear "pitted" or have chunks missing, you likely skipped the 5-minute natural release or used eggs that were too fresh without adjusting the time. If you notice a grey or greenish tint around the yolk, the eggs remained in the heat for too long; this is the result of iron in the yolk reacting with hydrogen sulfide in the white. To achieve the vibrant, sun-yellow center shown in the visual guide, the ice bath must be truly "cryogenic." If the shells are difficult to remove, try cracking the shell slightly before the ice bath to allow water to infuse the space between the membrane and the white.
THE DEEP DIVE
Macro Nutrition Profile:
A single large egg produced via this protocol contains approximately 78 calories, 6 grams of high-biological-value protein, and 5 grams of healthy fats. It is a nutrient-dense powerhouse, providing significant amounts of Choline and Vitamin D.
Dietary Swaps (Vegan/Keto/GF):
While there is no direct vegan "egg" that can be pressure cooked in-shell, Keto and Gluten-Free practitioners will find this a staple. For a piquant Keto snack, slice the eggs and top with a dollop of avocado oil mayo and smoked paprika.
Meal Prep & Reheating Science:
To maintain molecular structure, store eggs in their shells in a sealed container for up to seven days. If reheating is necessary, do not microwave. Instead, submerge the unpeeled egg in hot (not boiling) water for 10 minutes to gently warm the lipids without denaturing the proteins further.
THE KITCHEN TABLE
Why are my eggs cracking during pressure cooking?
Usually, this is due to a "thermal shock" before the lid is sealed. Ensure your eggs don't have micro-cracks and place them gently on the rack rather than dropping them into the pot.
Can I cook more than 12 eggs at once?
Yes. The 5 5 5 Protocol remains the same regardless of quantity, as long as the eggs are not packed so tightly that steam cannot circulate between them.
What if I want a softer, "jammy" yolk?
Reduce the initial pressure cook time from 5 minutes to 3 minutes. Keep the 5-minute natural release and the 5-minute ice bath consistent to ensure the whites are fully set.
Does the size of the egg matter?
Absolutely. This protocol is calibrated for "Large" eggs. If using "Jumbo" eggs, add 1 minute to the pressure cycle. For "Medium" eggs, subtract 1 minute to avoid over-solidifying the yolk.