Forget everything you know about the chaotic, unpredictable world of countertop fermentation. We are not just making breakfast; we are engineering a biological masterpiece within a pressurized stainless steel vacuum. The Instant Pot Yogurt protocol is the ultimate test of your culinary infrastructure. It is a high stakes game of temperature management where a single degree of deviation separates a silky, viscous masterpiece from a watery, piquant failure. You are the architect of a microbial skyscraper. Your mission is to shepherd billions of Lactobacillus acidophilus colonies through a controlled thermal cycle, transforming thin, liquid dairy into a dense, structural marvel. This is not a casual kitchen experiment. It is an audit of your patience and your precision. When you peel back that lid and see the pristine, porcelain surface of perfectly set yogurt, you are looking at the result of flawless thermal execution. The texture should be heavy, the flavor sharp yet creamy, and the satisfaction absolute. Prepare your station; we are about to stabilize the unstable.
THE DATA MATRIX
| Metric | Specification |
|---|---|
| Prep Time | 10 Minutes |
| Execution Time | 8 to 12 Hours (Incubation) |
| Yield | 1.9 Liters / 2 Quarts |
| Complexity (1-10) | 4 |
| Estimated Cost per Serving | $0.45 USD |
THE GATHERS
Ingredient Protocol:
- 1.9 Liters / 0.5 Gallon Whole Milk (Pasteurized, not Ultra-Pasteurized).
- 30ml / 2 Tablespoons Plain Yogurt with Live Active Cultures (The Starter).
- 15ml / 1 Tablespoon Vanilla Extract (Optional).
- 30ml / 2 Tablespoons Honey or Agave (Optional).
Section A: Ingredient Quality Audit:
The most common failure point in the Instant Pot Yogurt workflow is the milk selection. If you utilize Ultra-High Temperature (UHT) milk, the proteins have already been denatured to a point where they struggle to form a cohesive lattice. The result is a thin, weeping product. Always opt for standard pasteurized whole milk for maximum fat content and structural integrity. Furthermore, your "starter" must be fresh. If the cultures in your store bought yogurt are dormant or expired, the fermentation will stall. Ensure the container explicitly states "Live Active Cultures." If your yogurt is too tart, you have likely over-incubated; if it is too thin, your starter ratio was insufficient to colonize the volume of milk provided.
THE MASTERCLASS
1. The Scalding Phase
Pour your milk into the inner pot of the Instant Pot. Select the "Yogurt" function and adjust to "Sauté" or the "High" setting if your model allows for boiling. Use a digital scale to ensure your measurements are precise before heating. You must bring the milk to exactly 82 degrees Celsius (180 degrees Fahrenheit). Use a silicone spatula to scrape the bottom constantly, preventing the milk from scorching and creating a burnt film.
Pro Tip: This stage is not just about heat; it is about protein restructuring. Heating the milk to 82C denatures the whey protein lactoglobulin, which allows it to bind with the casein. This molecular bridge is what creates a thick, creamy mouthfeel rather than a runny consistency.
2. The Rapid Cool-Down
Once the milk hits the target temperature, remove the inner pot. You must now crash the temperature to 43 degrees Celsius (110 degrees Fahrenheit). The fastest method is an ice bath in your sink. Use a digital probe thermometer to monitor the decline. Do not let it drop below 40 degrees Celsius, or the cultures will not activate efficiently.
Pro Tip: Rapid cooling prevents the formation of a "skin" on the surface. If a skin does form, do not stir it back in. Use a bench scraper or a spoon to lift it off and discard it to maintain a perfectly smooth texture.
3. Inoculation and Integration
In a small saucier or bowl, whisk together your 30ml of starter yogurt with a cup of the warm milk until completely smooth. Once emulsified, pour this mixture back into the main pot. Stir gently with a whisk to ensure the cultures are evenly distributed throughout the entire volume.
Pro Tip: Over-stirring at this stage can introduce too much air. You want to infuse the starter into the milk without creating foam. Excess bubbles on the surface will create an uneven, pitted texture once the yogurt sets.
4. The Incubation Marathon
Place the pot back into the base. Secure the lid (the venting knob position does not matter here). Select the "Yogurt" function and set the timer for 8 to 10 hours. The longer the incubation, the more piquant and firm the result will be.
Pro Tip: Avoid the temptation to open the lid. Every time you break the seal, you fluctuate the internal temperature and disrupt the microbial colonization. Constant, steady heat is the key to a professional grade ferment.
5. The Final Stabilization
Once the timer expires, the yogurt will look soft. Do not stir it. Remove the inner pot, cover it with plastic wrap, and refrigerate for at least 6 hours. This "cold set" is vital for the molecular structure to fully solidify.
Pro Tip: If you desire "Greek" style yogurt, use a fine mesh strainer lined with cheesecloth to drain the whey for 2 to 4 hours after the cold set. This will significantly increase the density and protein concentration per gram.
Section B: Prep & Timing Fault-Lines:
Timing is the silent killer of quality dairy. If you leave the milk at 82C for too long, you risk a "cooked" flavor that ruins the delicate profile of the yogurt. Conversely, if you add your starter when the milk is above 46C, you will scald and kill the live cultures, resulting in a pot of warm milk that never thickens. Use a timer for every phase. If your kitchen is particularly cold, wrap the Instant Pot in a towel during the incubation phase to assist the internal heating element in maintaining a localized micro-climate.
THE VISUAL SPECTRUM
Section C: Thermal & Visual Troubleshooting:
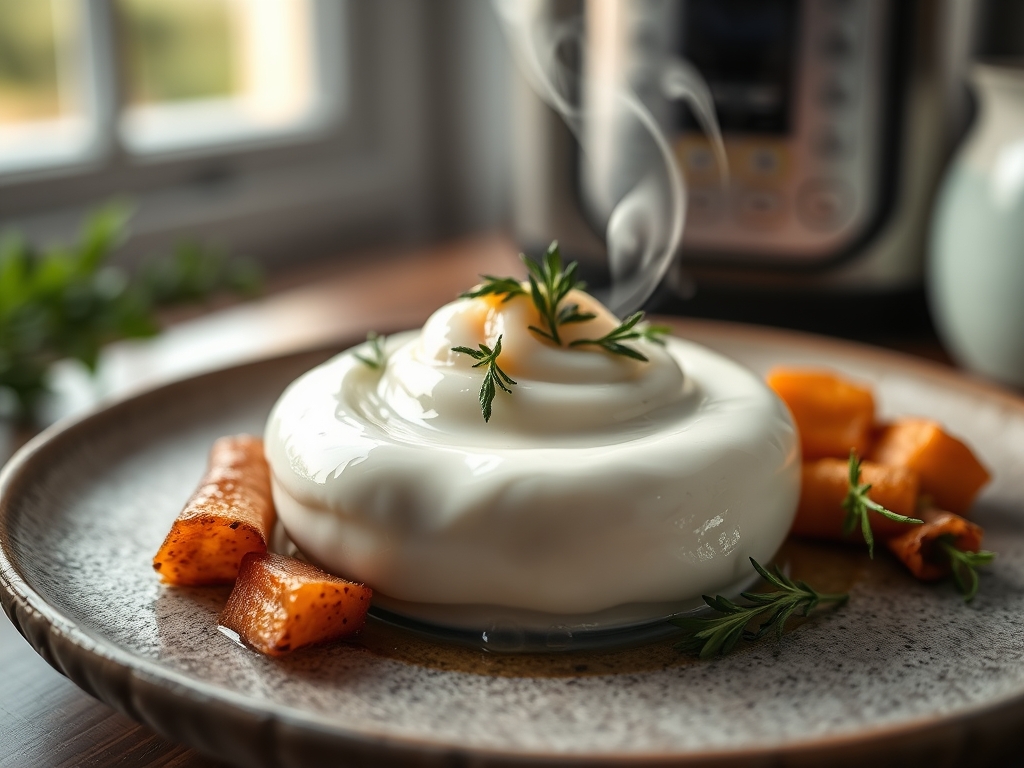
Look at the Masterclass photo above. Notice the glossy, reflective surface and the way the yogurt holds a sharp edge when scooped. If your yogurt looks "lumpy" or resembles cottage cheese, you likely whisked the starter too vigorously or the milk was too hot during inoculation. If you see a yellow liquid pooling on top, that is whey. While natural, excessive whey indicates over-fermentation or a lack of fat in the milk. For a dull, matte finish, check your milk quality; higher fat content (6% or "Jersey" milk) will produce a high-gloss, viscous sheen that is visually superior.
THE DEEP DIVE
Macro Nutrition Profile:
A standard 240ml serving of this homemade yogurt contains approximately 150 calories, 8g of protein, 12g of carbohydrates, and 8g of fat. By straining the yogurt into a Greek style concentrate, you can nearly double the protein density while reducing the carbohydrate count as the lactose-rich whey is removed.
Dietary Swaps:
For a Vegan alternative, utilize full fat coconut milk with a vegan-specific starter culture. Note that plant based fats do not have the same protein structure as bovine milk, so you may need to aerate in a thickening agent like agar-agar. For Keto enthusiasts, use a mix of whole milk and heavy cream to increase the lipid profile and create an ultra-decadent texture.
Meal Prep & Reheating Science:
Yogurt is a living product. Store it in glass airtight containers to prevent the absorption of refrigerator odors. It will stay fresh for up to two weeks. Never "reheat" yogurt in a microwave if you want to preserve the probiotic benefits; high heat will kill the bacteria. If using in a warm sauce, temper the yogurt by adding small amounts of the hot liquid to the yogurt first to prevent curdling.
THE KITCHEN TABLE
Why is my yogurt runny?
Usually, this is due to "weak" starter cultures or insufficient heating of the milk. Ensure you hit 82C to denature proteins and use a fresh starter. If all else fails, strain it through cheesecloth to manually increase the thickness.
Can I use frozen yogurt starter?
Yes, you can freeze 30ml portions of your previous batch in ice cube trays. Thaw completely to room temperature before attempting to inoculate a new batch. Do not add frozen cubes directly to the warm milk.
Is the liquid on top safe to drink?
That liquid is whey, and it is packed with protein and minerals. You can stir it back into the yogurt for a thinner consistency or pour it off and use it in smoothies or as a sourdough starter liquid.
Do I need a special lid?
No. Since the yogurt function does not use high pressure, you can even use a glass lid that fits the pot. The standard lid works perfectly fine, but ensure the silicone ring is clean of savory odors.