Stop settling for the limp, gray, waterlogged stalks of the past. If your vegetable game feels like a bureaucratic nightmare of soggy fibers and uninspired seasoning, it is time for a total infrastructure overhaul. We are talking about high-velocity convection. We are talking about the Maillard reaction occurring at lightning speed. We are talking about Air Fryer Asparagus. This is not just a side dish; it is a masterclass in structural integrity and thermal efficiency. When you subject a fresh stalk to the high-speed air circulation of a modern air fryer, you are not merely cooking it. You are flash-dehydrating the exterior to create a crisp, charred cuticle while simultaneously steaming the interior with its own cellular moisture. The result is a vibrant, snapping texture that puts traditional roasting to shame. In exactly six minutes, you can transform raw, woody perennials into a gourmet asset that commands attention on any plate. Let us calibrate your kitchen for maximum output and superior crunch.
THE DATA MATRIX
| Metric | Specification |
|---|---|
| Prep Time | 4 Minutes |
| Execution Time | 6 Minutes |
| Yield | 2-3 Servings |
| Complexity | 2/10 |
| Estimated Cost per Serving | $1.25 – $1.75 |
THE GATHERS
Ingredient Protocol:
- 450g / 1 lb Fresh Asparagus (Medium thickness preferred)
- 15ml / 1 tbsp Extra Virgin Olive Oil
- 3g / 0.5 tsp Kosher Salt
- 1g / 0.25 tsp Freshly Cracked Black Pepper
- 5g / 1 tsp Garlic Powder
- 15ml / 1 tbsp Fresh Lemon Juice
- 15g / 2 tbsp Finely Grated Parmesan Cheese (Optional)
Section A: Ingredient Quality Audit:
The primary failure point in any Air Fryer Asparagus operation is the raw material. If your stalks are limp before they hit the heat, no amount of convection can save them. Look for tight, closed buds at the tip. If the tips are flowering or mushy, the sugars have already begun to break down into starch; this results in a bitter, dusty flavor profile. To fix slightly dehydrated stalks, trim the ends and submerge them vertically in 50ml of ice water for twenty minutes to restore turgor pressure. Furthermore, avoid "pencil-thin" stalks for this specific protocol. They lack the thermal mass to survive a six-minute blast without turning into carbonized twigs. Aim for a diameter of roughly 10mm to 12mm for optimal results.
THE MASTERCLASS

Step-by-Step Execution:
1. Mechanical Trimming and Calibration
Wash the stalks and pat them dry with surgical precision. Use a bench scraper or a sharp chef knife to remove the woody, fibrous bases. Do not rely on the "snap test" as it is inconsistent and wasteful. Instead, line the stalks up and slice the bottom two inches off in one clean motion.
Pro Tip: Removing surface moisture is non-negotiable. Excess water creates a localized steam envelope that prevents the oil from adhering and inhibits the Maillard reaction. Use a digital scale to ensure your oil-to-vegetable ratio is exact.
2. Emulsified Coating Application
Place the asparagus in a large stainless steel mixing bowl. Drizzle the olive oil and sprinkle the salt, pepper, and garlic powder. Toss vigorously until every millimeter of the surface area is coated. The oil acts as a thermal conductor, ensuring the heat penetrates the fibrous exterior evenly.
Pro Tip: If you want a more viscous coating that clings better, whisk the oil and spices in a small saucier before drizzling. This ensures an even distribution of aromatics, preventing "hot spots" of seasoning.
3. Loading the Convection Chamber
Preheat your air fryer to 200C / 400F. Arrange the stalks in a single layer. Overcrowding is the enemy of crispness. If the air cannot circulate around each individual stalk, you are essentially boiling them in a confined space.
Pro Tip: Use a pair of silicone-tipped tongs to ensure the tips are pointing toward the center of the basket where the airflow is most concentrated. This protects the delicate buds from scorching while the thicker bases receive maximum thermal energy.
4. The Six-Minute Flash
Slide the basket in and set the timer for six minutes. At the three-minute mark, perform a manual agitation. Shake the basket to rotate the stalks, ensuring the underside receives direct contact with the high-velocity air.
Pro Tip: This is the "render" phase. The high heat begins to render the natural sugars in the vegetable, creating those sought-after brown charred spots. Monitor the internal fan speed if your unit allows; higher speeds yield better "snap."
5. Acidic Infusion and Finishing
Once the timer expires, immediately transfer the asparagus to a warm plate. Squeeze the fresh lemon juice over the stalks while they are still radiating heat. The citric acid will infuse into the charred exterior, brightening the flavor and cutting through the richness of the oil.
Pro Tip: If using Parmesan, microplane it over the stalks the second they exit the fryer. The residual heat will slightly melt the cheese, creating a piquant crust without burning the delicate milk solids.
Section B: Prep & Timing Fault-Lines:
The most common human error is the failure to preheat. If you start with a cold chamber, the asparagus sits in a lukewarm environment for three minutes, leaking moisture and becoming rubbery before the searing process begins. Always allow your unit to reach 200C before deployment. Another fault-line is inconsistent stalk thickness. If your batch contains both jumbo and thin stalks, the thin ones will turn to ash while the jumbo ones remain raw. Use your digital scale to sort your batches by weight and thickness for uniform execution.
THE VISUAL SPECTRUM
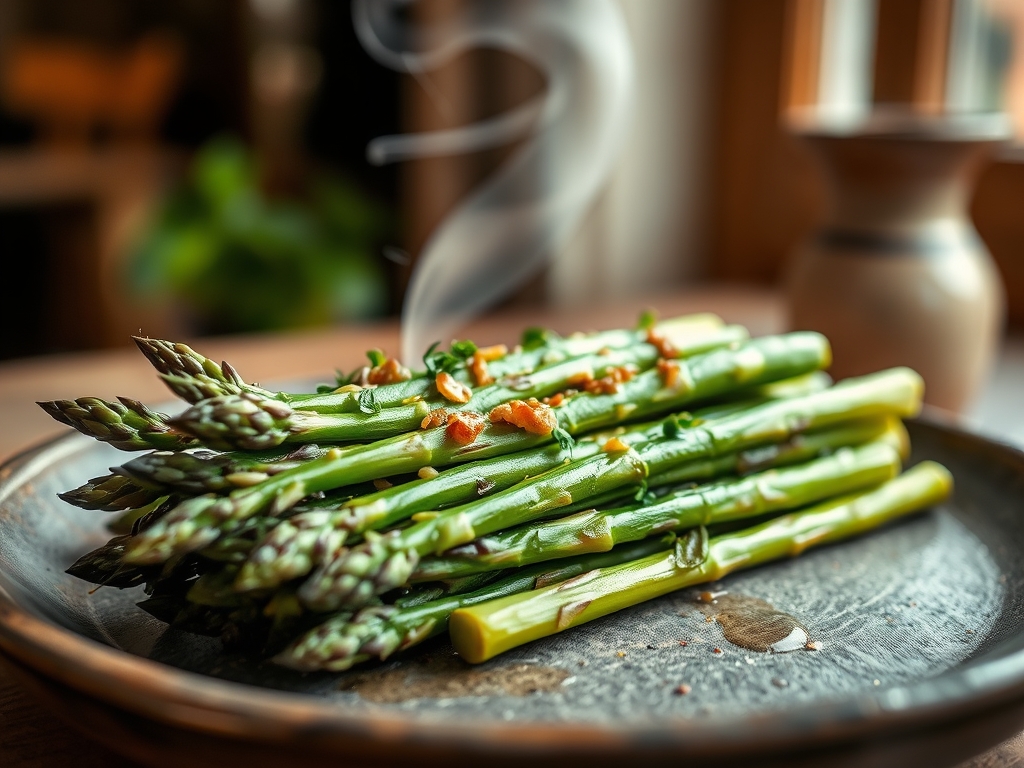
Section C: Thermal & Visual Troubleshooting:
Referencing the Masterclass photo above, look for the "Golden Ratio" of color. You want vibrant forest green in the center with localized "leopard spotting" or charring on the tips and edges. If your asparagus looks dull or olive-drab, you have overcooked it, destroying the chlorophyll. If it looks bright green but feels floppy, the temperature was too low; the moisture evaporated without the exterior structure setting. To fix uneven browning, ensure you are not using a parchment liner that blocks the bottom vents of the air fryer basket. Airflow must be 360 degrees to achieve that professional, blistered aesthetic.
THE DEEP DIVE
Macro Nutrition Profile:
A standard serving (approx. 150g) delivers roughly 85 calories, 7g of healthy fats, 4g of fiber, and 3g of protein. It is a micronutrient powerhouse, loaded with Vitamin K and Folate. Because we are using high-heat air frying, we use 70% less oil than traditional pan-frying, keeping the lipid profile optimized for cardiovascular health.
Dietary Swaps:
- Vegan: The base recipe is already vegan. Swap Parmesan for nutritional yeast to maintain that piquant umami hit.
- Keto: This is a low-carb goldmine. Increase the olive oil or add a dollop of grass-fed butter post-cook to boost healthy fats.
- GF: Naturally gluten-free. Ensure your garlic powder does not contain anti-caking agents derived from grain if you are highly sensitive.
Meal Prep & Reheating Science:
Asparagus is notoriously difficult to reheat because the cellular walls collapse upon cooling. To maintain molecular structure, do not use a microwave. Re-introduce the stalks to the air fryer at 190C for 2 minutes. This quickly evaporates any recaptured moisture and re-crisps the cuticle without overcooking the core.
THE KITCHEN TABLE
How do I prevent the tips from burning?
Position the tips toward the center of the basket or slightly overlap them. The tips have less mass and higher surface area, making them prone to rapid dehydration. A light extra coating of oil on the tips also provides a thermal buffer.
Can I use frozen asparagus?
Negative. Frozen asparagus has undergone ice crystallization which ruptures the cell walls. When air fried, it will release too much water, resulting in a mushy texture. For this specific high-heat protocol, fresh is the only acceptable baseline.
Why is my asparagus still woody?
You failed the Prep & Timing Audit. You must aggressively trim the bottom 2-3 inches where the lignin concentration is highest. If the stalks are exceptionally thick, use a vegetable peeler to remove the outer skin of the bottom half.
What other oils can I use?
While Extra Virgin Olive Oil provides the best flavor, Avocado oil is a superior alternative due to its higher smoke point. Avoid butter during the cooking phase as the milk solids will burn and become bitter at 200C.